LOGO

The Fab Academy 2014

Digital Fabrication Laboratory. Department of Architecture.

Institute of Technology. EPS-CEU San Pablo CEU University

Adolfo Gutiérrez Sánchez

Architect

  Home Portfolio Files
INTERFACE & APPLICATION PROGRAMMING

Interface

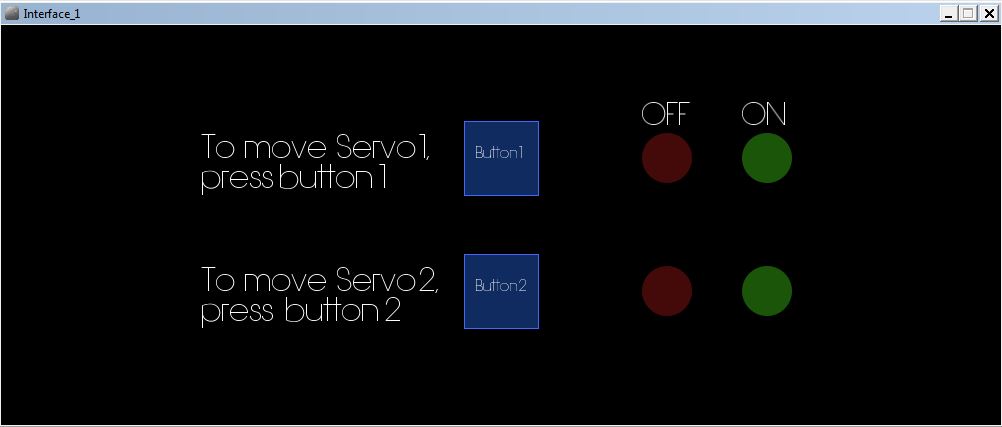
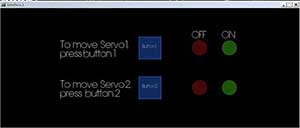
The assignment

The assignment for this week was to write a code for a program that can interact with an Input or an Output device.

The chosen software to write the code is Processing, because I have already used it and I want to improve my level a little better.

The idea is to control two different servos with the FabDuino board using a program written in Processing. The design will be two different buttons that control the servos and the buttons and some "LED lights" will interact with the program.

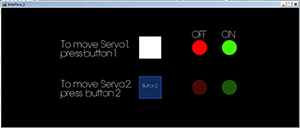
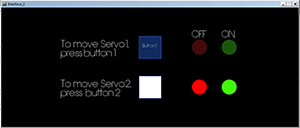
Processing code

The idea of before starting to write the code in PROCESSING, is to create a two buttons interface where I can interact between the Arduino board with two servos connected and the computer screen.

The graphics will be very simple, but will always tell you, wether the servo 1 is connected and working or is the servo 2 the one is working.

When the button 1 is pressed, the button highlights and starts a counter that will switch between the ON and OFF leds. If the button 2 is pressed, the same process starts. There is no limitation and the buttons do not interfere the connections if both of them are On or OFF.

1. SET ALL THE VARIABLES

import cc.arduino.*;
import processing.serial.*;
Serial myPort;

float bx;
float by;
int boxSize = 75;
boolean overBox1 = false;
boolean overBox2 = false;
boolean locked = false;
float xOffset = 0.0;
float yOffset = 0.0;

int count;

color White = color(255,255,255);
color Black = color(0,0,0);
color Green = color(63,250,8);
color DarkGreen = color (26,85,9);
color Red = color(255,0,0);
color DarkRed = color (67,10,10);
color Grey = color(65,103,255);
color DarkBlue = color(16,43,95);
color LightBlue = color(65,103,175);


int ancho = 1000;
int alto = 400;

int WidthRectangle = 100;
int HeightRectangle = 100;

01
02
03

2. SET THE VOID SETUP: OPEN THE SERIAL PORT AND SET MORE VARIABLES

void setup()
{

println(Serial.list());
// Open the port that the Arduino board is connected to (in this case #0)
// Make sure to open the port at the same speed Arduino is using (9600bps)
myPort = new Serial(this, Serial.list()[0], 9600);


size(ancho, alto);
bx = ancho/2;
by = alto/3;
rectMode(RADIUS);

}


3. SET THE VOID DRAW: SET THE BACKGROUND AND ALL THE GRAPHICS THAT ARE GOING TO BE DISPLAYED, AND ALL THE "IF" RULES THAT WILL START WITH THE PROGRAM

void draw()
{
background(0);

fill(White);
textSize(32);
PFont font;
font = loadFont("Hasteristico-Light-32.vlw");
textFont(font, 32);
text("To move Servo 1,", ancho/5, alto/3);
text("press button 1", (ancho/5), (alto/3)+30);

text("To move Servo 2,", (ancho/5), (alto/3)*2);
text("press button 2", (ancho/5),((alto/3)*2)+30);


// Test if the cursor is over the box 1
if (mouseX > ancho/2-boxSize/2 && mouseX < ancho/2+boxSize/2 &&
mouseY > alto/3-boxSize/2 && mouseY < alto/3+boxSize/2 ) {


overBox1 = true;
if(!locked) {
stroke(White);
myPort.write('ON');
fill(LightBlue);
}
} else {
stroke(Grey);
myPort.write('OFF');
fill(DarkBlue);
overBox1 = false;
}


// Draw the box 1
rect(ancho/2, alto/3, boxSize/2, boxSize/2);
fill(White);
textSize(15);
text("Button 1", (ancho/2)-(boxSize/3), alto/3);


// Test if the cursor is over the box 2
if (mouseX > ancho/2-boxSize/2 && mouseX < ancho/2+boxSize/2 &&
mouseY > (alto/3)*2-boxSize/2 && mouseY < (alto/3)*2+boxSize/2 ) {


overBox2 = true;
if(!locked) {
stroke(White);
myPort.write('ON');
fill(LightBlue);
}
} else {
stroke(Grey);
myPort.write('OFF');
fill(DarkBlue);
overBox2 = false;
}


// Draw the box 2
rect(ancho/2, (alto/3)*2, boxSize/2, boxSize/2);
fill(White);
textSize(15);
text("Button 2", (ancho/2)-(boxSize/3), (alto/3)*2);


//Draw the circles ON&OFF

noStroke();
if(overBox1) {
locked = true;
fill(Red);
} else {
fill(DarkRed); }

ellipse((ancho/3)*2, alto/3, 50,50);


if(overBox2) {
locked = true;
fill(Red);
} else {
fill(DarkRed);}

ellipse((ancho/3)*2, (alto/3)*2, 50,50);


fill(White);
textSize(30);
text("OFF", ((ancho/3)*2)-25, alto/4);
text("ON", ((ancho/3)*2)+75, alto/4);

if(overBox1) {
locked = true;
fill(Green);
} else {
fill(DarkGreen);}

ellipse(((ancho/3)*2)+100, alto/3, 50,50);


if(overBox2) {
locked = true;
fill(Green);
} else {
fill(DarkGreen);}

ellipse(((ancho/3)*2)+100, (alto/3)*2, 50,50);

}

4. SET THE VOID MOUSE PRESSED AND MOUSE DRAGGED: SET THESE FUCNTIONS THAT WILL OPEN WHEN THE MOUSE PRESSES ONE O THE BUTTONS

void mousePressed() {

if(overBox1 || overBox2) {
locked = true;
fill(White);
count = count +1;

//myPort.write('Servo1ON');
} else {
locked = false;
// myPort.write('Servo1OFF');
}
xOffset = mouseX-bx;
yOffset = mouseY-by;
}

void mouseDragged() {
if(locked) {
bx = mouseX-xOffset;
by = mouseY-yOffset;
}
}

void mouseReleased() {
locked = false;
}


04


Processing code

The next step is to set the Arduino code that will run in the microcontroller of the FabDuino. This code will transmit the data collected fro the Processing code and will transform it into movement.

1. SET THE INITIAL VARIABLES

int servo1 = 7;
int servo2 = 6;

int angle;
int pwm;

int incomingByte;


2. SET THE VOID SETUP: WILL START THE SERIAL PORT AND SET THE PINS OF TH SERVOS AS AN OUTPUT

void setup()
{
Serial.begin(9600);

pinMode(servo1, OUTPUT);
pinMode(servo2, OUTPUT);
}


2. SET THE VOID LOOP: SET THE ROTATION OF THE SERVO ACCORDING TO THE MOUSE INTERACTION IN THE PROCESSING INTERFACE

void loop ()
{


for (angle = 0; angle <= 140; angle += 5) {
servoPulse(servo1, angle); }
for (angle = 140; angle >= 0; angle -= 5) {
servoPulse(servo1, angle); }
}

void servoPulse (int servo1, int angle)
{
pwm = (angle*11) + 500; // Convert angle to microseconds

if (Serial.available() > 0) {
incomingByte = Serial.read();
if (incomingByte == 'Servo 1 ON') {
digitalWrite (servo1,HIGH);
delayMicroseconds(pwm);
}
if (incomingByte == 'Servo 1 OFF');
digitalWrite(servo1, LOW);
}

if(incomingByte == 'Servo 2 ON'); {
digitalWrite (servo2,HIGH);
delayMicroseconds(pwm);
}
if (incomingByte == 'Servo 2 OFF'); {
digitalWrite (servo2, LOW);
delayMicroseconds (pwm);
}